May 29, 2017

Last Week in VFX

Quick update this time.  Just showcasing some recent visual effects work I did over the past week.

Like my last post, it's all "day for night" stuff this time around.  It might look a little dark on a computer or phone, but these should look pretty nice in a darkened theater.

Anyway, enjoy these before and after shots!


Some have additional effects as well, like the flowing mist/dust in the flashlight shot below:


And now… the toughest shot of them all (and also my favorite):


The Original Footage:


The Final Result:


Still more to go, but I'm really happy with how these shots are turning out.

- Erik (Director)

May 18, 2017

VFX: Day for Night

Hey everyone!  Back with another VFX update.

Now before I explain what I've done, check out this clip below:


Does it look like it was filmed in the night?  Well, this was actually a test to see how well I could pull off a "day for night" shot.  Yep, it was actually filmed in broad daylight.

Believe it or not, here's the original clip:


Crazy, right?  There are many ways to go about doing a day for night shot, but the quickest is just to apply some simple color corrections (notably reducing the brightness, and turning everything blue):


Unfortunately, I wasn't quite satisfied with the simple method above.  As you can see, the background is much too visible, especially the sky.

So I had to do some rotoscoping (you know... that super tedious process where you edit clips frame-by-frame) to separate my character from the background.  Here's the result (called a "matte"):


Luckily, because it's a night shot, I was able to do a rougher job of it and decrease the time it takes quite a bit.  And the final result looks just as good:


There's still a lot work to do with the rest of the day for night shots.  But luckily I believe this test was a success, and I think I can now pump out these shots in a reasonable amount of time.

As always, looking forward to posting more as I progress!

- Erik (Director)

April 27, 2017

Preparing a Fire Scene

Been a while since my last post.  I've had to switch gears recently from post-production back to actual filming as there's a lot of little insert shots/scenes that I'm starting to need now (as part of the VFX stage).  A switch that's slowed down my process a bit, but I'm closing in on finally having all this extra footage in the can, so I should be getting back to posting more frequently in the near future.

Otherwise, here's some photos in preparation for a fire scene (which should be a pretty cool sequence).

First up, testing out a firefighter outfit...

(Click image for higher resolution)

Then, some burn/ash makeup tests...

(Click image for higher resolution)

And in other news…

Remember that news scene I was preparing the mic flag for (with my little "RP 6 News" logo on it)?  Well, I finished up the filming for that as well as the visual effects for it!

Here's what the original footage looked like:

(Click image for higher resolution)

And here's the final result:

(Click image for higher resolution)

Really happy with how it turned out.  One of the coolest visuals in the film now, and it actually wasn't all that hard to achieve.

Gonna try to post more frequently now.  Aiming for about once a week, but we'll see.

- Erik (Director)

March 17, 2017

Creating Fictional Websites

Now time for something really different!  Throughout the course of the film, my main character is constantly trying to solve a mystery.  Much of this involves physical searches, but some of this requires diving into the digital world… searching for clues online.  And for that, I had to create a series of websites!  (As always, click each image for higher resolution.)

First up, a search engine.


Next, a news article.


Then, a defunct company website.


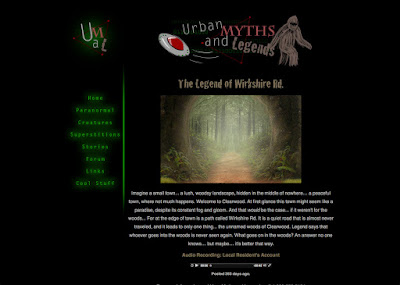
And finally, a site called "Urban Myths and Legends".


I had a lot of fun creating these.  When I first started this film years ago, I actually wanted these to be fully functioning websites that people could really explore.  I actually did that to some degree with the "Urban Myths and Legends" one (though it's not online).  But creating the rest proved to be way more work than was worth my time.  So for now they're just images.

Anyway, enjoy!

- Erik (Director)

February 17, 2017

VFX: A Woodsy View

Quick post today.  Just wanted to share another photo composite I did.  This is basically the view from Charlie's window (my main character).  The perspective is a tad off in parts, and I think I may have placed the view a little higher than it should be, but otherwise I'm very happy with how it turned out.  Should provide me with some good POV shots, and some cool moments looking over Charlie's shoulder out at the mysterious woods.

(Click image for higher resolution)

And like I did with my last few posts, here's a breakdown of the shot:


Really pumping out these VFX shots now.  Looking forward to posting more!

- Erik (Director)

February 14, 2017

VFX: Creating a Weathered Sign

More VFX stuff today, all about creating a weathered street sign.

In the story, there's an abandoned road that leads to the local woods.  This calls for a forgotten street sign, one that's been slightly worn through years of neglect.  The first step?  Setting out to research different designs of street signs as they appear in the real world.  The second step?  Recreate your own in Photoshop:

(Click image for higher resolution)

Now the fun part, messing it up!  Through a combination of smudges, filters, and burn techniques, we have our weathered look.  I chose to keep the text very readable though, so it's only slightly weathered.  Still, our sign has seen better days...

(Click image for higher resolution)

The next step is to put it in the actual scene.  Through some relatively simple 3d modeling of a street pole, and the combined efforts of various 3d applications, we are able to turn this still image into a digital prop.

(Click image for higher resolution)

And through some simple compositing and animation, our scene goes from this...


To this...


I'm really happy with how it turned out; one of my favorite shots in the film so far!  Looking forward to posting more!

- Erik (Director)

February 11, 2017

Preparing a News Scene

I must confess, I'm not entirely done with filming.  There's a few odds and ends still left that I've been setting aside since they don't involve the main actors (and hence can be filmed whenever).  But after continually going back and forth between editing, visual effects, and filming the occasional insert shot, it's been a little hard to keep track of it all.  So, for the time being I've set aside post-production until I'm truly done with filming.  And I gotta say, it feels really nice to be back in production, standing and moving, getting outside, working with something physical rather than just a computer.

There's still about 3-4 full side scenes left to film.  And one of those… a news report.

(Click image for higher resolution)

This is the main thing I needed up until recently for the scene: a mic flag, you know… one of those little boxes with the channel's logo on it.

I was able to get it pretty cheap: approx. $10.  And that would otherwise be uneventful news… if not for the fact that I foolishly decided to CUSTOM BUILD one out of a tissue box BEFORE realizing I could just buy one!  Argh!

So, without further ado, I bring you my crazy process of building one on my own...

As I mentioned earlier, I began with a tissue box, cutting it into corners so I could shrink it to the right size I wanted.

(Click image for higher resolution)

Here's a size comparison.  Ah, the power of "Tissue Box Shrinkage"!

(Click image for higher resolution)

After taping it together at the right size, I began cutting appropriately sized holes for the mic I was going to use.  Then, I wrapped it in a single sheet of paper to smooth out the edges.

(Click image for higher resolution)

Up next, designing a logo.

(Click image for higher resolution)

Then printing it out and wrapping it around the box.

(Click image for higher resolution)

Tape it down, and you've got yourself your very own, custom-built (and completely unnecessary) mic flag!

(Click image for higher resolution)

- Erik (Director)

January 27, 2017

VFX: Creating a Digital Scene

Back again with another post, dedicated to one of the more complex VFX shots in the film.  Pretty simple compared to a major Hollywood blockbuster, but relatively complicated nonetheless (and the first time I've ever done something like this myself).  Check it out:


Okay, so let's break it down.

It all starts with a base plate, the raw footage from the set:


The first step is to isolate the character from the original background.  Typically, this would be done with green screens.  Unfortunately, I have had little success with green screening (probably due to my camera being so old), so I went a route I could trust myself with a little more.  Regrettably, this path required a lot more manual labor, and likewise a LOT more time: cutting him out frame-by-frame (aka "rotoscoping", a VFX guy's worst nightmare).


I only cut out the upper portion of our character, since I knew everything below that would all be foreground material.


Next up, creating a fantastical world around him.  Since I had previously completed the entrance to the woods in another VFX shot (the poster), I was able to reuse much of that material for this.  Flip some things around, change the background, add in a few new details, and BAM!  The woods from the inside

(Click image for higher resolution)

It looks a little weird on its own, but this is really all I needed to make the scene around him work.

Then comes the tricky part.  Layering it all together, and animating it in such a way that it creates the illusion of the camera dollying backwards through the woods.  Yet, a simple combination of zoom, scale, distortion, and layers is all it takes.  I'm really glossing over a major step here, but this is where the magic really happens.  Add in some color correction… and you've got your shot!


And there you have it!  Most of my shots are not this complex (thankfully), but I had a lot of fun seeing this one through.  Definitely a challenge, but pretty rewarding to see it completed.

Looking forward to posting more!

- Erik (Director)
January 20, 2017

VFX: POV Overlays

Second post of the year (and on the same month!).  Truthfully, I'd like to post at least once a week this year, but we'll see.  *Fingers crossed*

Today's post is a simpler one than usual.  Rather than waiting till only major updates are available (which makes for a very inactive blog), I figured this year I should post little bits and pieces more often.  So in that spirit, today I bring you a couple of simple visual overlays I recently made.

Two POV styles: a camera's viewfinder, and a pair of binoculars.


They're pretty simple, but a lot more work goes into them than you might expect.  For example, there's actually a little bit of pixelation applied to the viewfinder's graphics, while the binoculars have an ever-so-slight shade of blue around the edges.  And here's some of the fonts I had to decide between for the viewfinder's timecode:


I know there's a lot of preset tools already out there for this sort of thing, but for the sake of control and authenticity, I chose to make them myself.

Finally, here's some shots of the overlays in action:


And so begins a series of smaller, yet (hopefully) more frequent posts this year!

- Erik (Director)